こんにちは、ヨリユです。
LWC開発において、下記の要件があるのではないでしょうか。
要件:値の保存後、ページ全体を更新することなく、ページの一部(コンポーネントのデータ)を更新したい。
上記要件は、LWCで提供されている「RefreshView API」を使用すると実現できます。
今回は、「RefreshView API」を用いたサンプルコンポーネントを作成しましたので、共有させていただきます。
開発者ガイドはこちら。
どんなものを作成した?
レコードページ(取引先)に配置可能なコンポーネントを作成しました。
機能概要は以下のとおりです。
機能①:標準コンポーネントの値を更新すると、カスタムコンポーネントの値が更新される。
機能②:カスタムコンポーネントの値を更新すると、標準コンポーネントの値が更新される。
機能①②共通:値の保存後、ページ全体ではなく、ページの一部が更新される。
それでは動作を確認していきます。
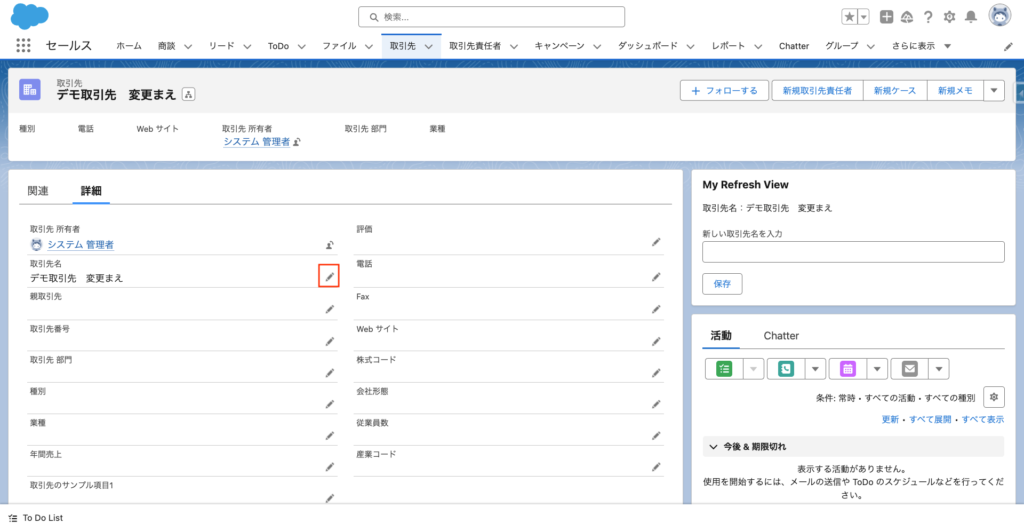
機能①:標準コンポーネントの値を更新すると、カスタムコンポーネントの値が更新される。
手順は以下のとおりです。
- 「取引先名」の「編集アイコン」をクリックする。
- 「取引先名」の値を変更し、「保存」をクリックする。
- カスタムコンポーネントの「取引先名」が変更した値に更新される。
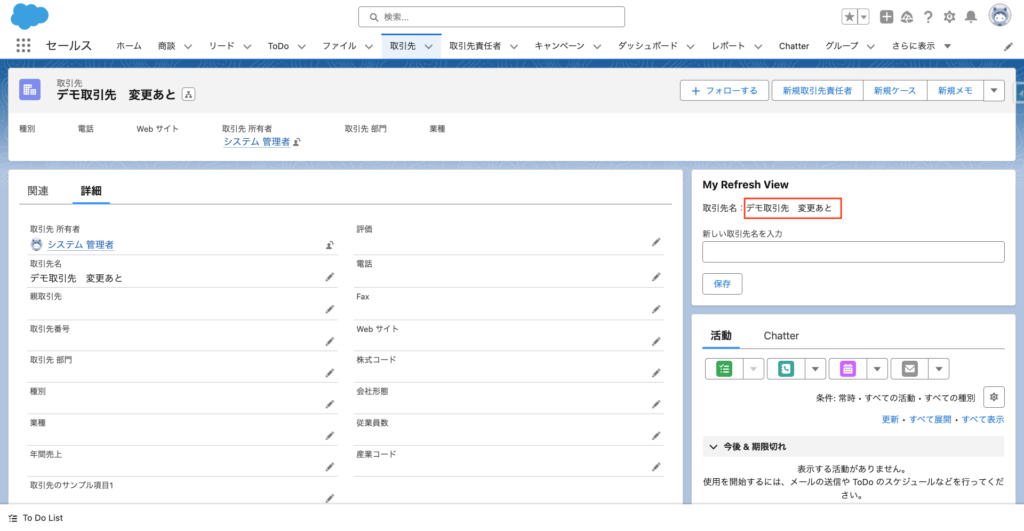
- 「取引先名」の「編集アイコン」をクリックする。
- 「取引先名」の値を変更し、「保存」をクリックする。
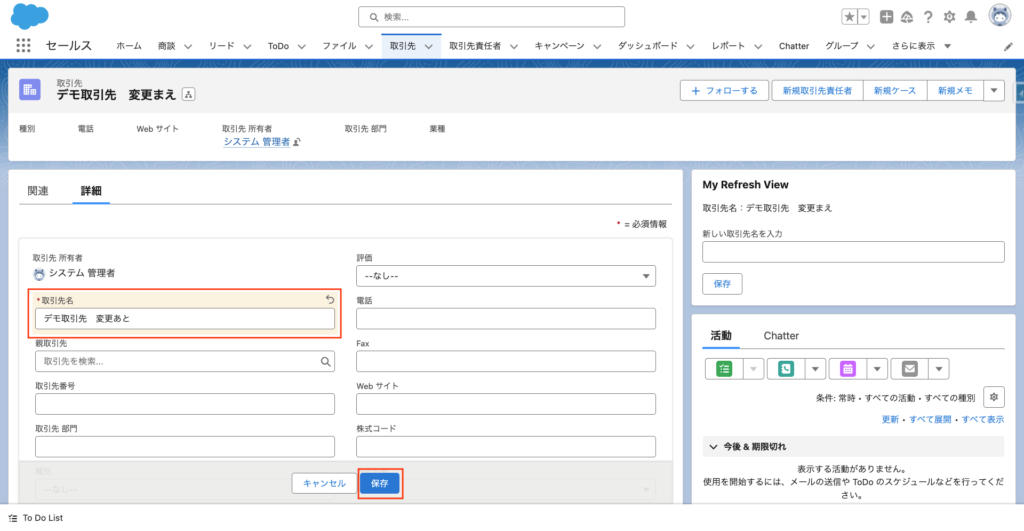
- カスタムコンポーネントの「取引先名」が変更した値に更新される。
(画面全体の更新はされない)
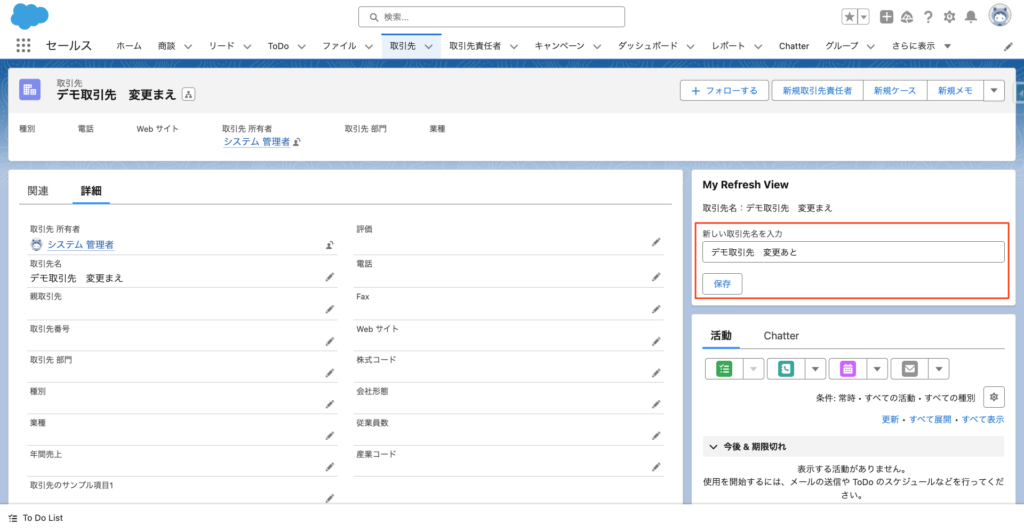
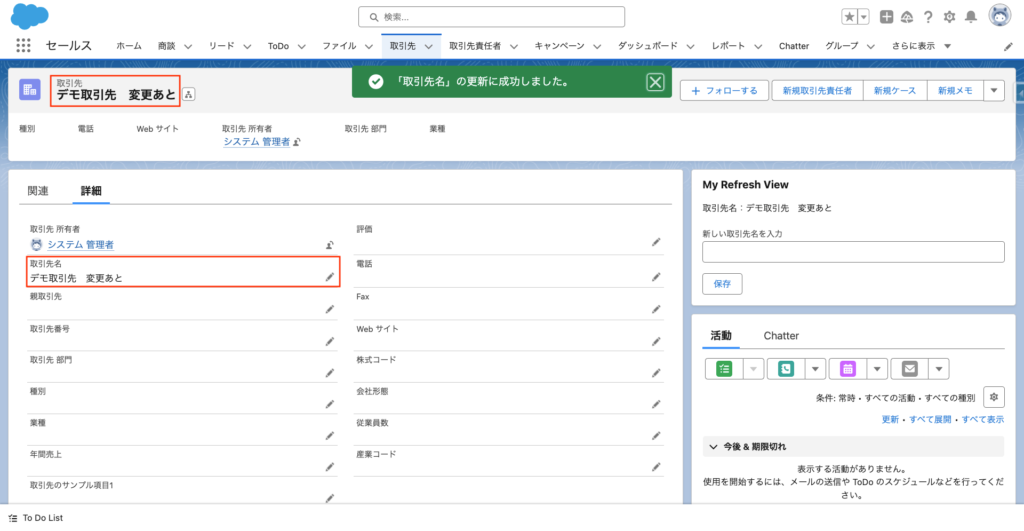
機能②:カスタムコンポーネントの値を更新すると、標準コンポーネントの値が更新される。
手順は以下のとおりです。
- カスタムコンポーネントの「新しい取引先名を入力」欄に値を入力し、「保存」をクリックする。
- 詳細と強調表示パネルの「取引先名」が変更した値に更新される。
- カスタムコンポーネントの「新しい取引先名を入力」欄に値を入力し、「保存」をクリックする。
- 詳細と強調表示パネルの「取引先名」が変更した値に更新される。
(画面全体の更新はされない)
サンプルコード
【LWC:myRefreshView】
<template>
	<lightning-card title="My Refresh View">
		<div class="slds-var-m-around_medium">
			<template if:true={account}>
				取引先名:{account.Name}
				<div class="slds-m-vertical_medium">
					<lightning-input type="text" label="新しい取引先名を入力" lwc:ref="newAccountName"></lightning-input>
				</div>
				<lightning-button
					onclick={handleSave}
					aria-haspopup="dialog"
					label="保存">
				</lightning-button>
			</template>
		</div>
	</lightning-card>
</template>
import { LightningElement, api } from 'lwc';
import { ShowToastEvent } from "lightning/platformShowToastEvent";
import { RefreshEvent, registerRefreshHandler, unregisterRefreshHandler } from "lightning/refresh";
import getAccount from '@salesforce/apex/MyRefreshViewController.getAccount';
import updateAccount from "@salesforce/apex/MyRefreshViewController.updateAccount";
export default class MyRefreshView extends LightningElement {
@api recordId;
refreshHandlerId;
account;
connectedCallback() {
// メソッドを登録(「RefreshEvent」を受け取ると処理される)
this.refreshHandlerId = registerRefreshHandler(this, this.refreshHandler);
this.fetchAccount();
}
disconnectedCallback() {
unregisterRefreshHandler(this.refreshHandlerId);
}
refreshHandler() {
return new Promise(resolve => {
this.fetchAccount();
resolve(true);
})
}
fetchAccount() {
getAccount({ "accountId": this.recordId }).then(response => {
this.account = response[0];
}).catch(error => {
console.log("Error: " , error);
})
}
async handleSave(event) {
const result = await updateAccount({
"accountId": this.recordId,
"newAccountName": this.refs.newAccountName.value
});
if (result === "0") {
this.dispatchEvent(
new ShowToastEvent({
title: "「取引先名」の更新に成功しました。",
variant: "success"
})
);
// 「RefreshEvent」を発行
this.dispatchEvent(new RefreshEvent());
this.refs.newAccountName.value = '';
} else {
console.log("Error: " , result);
}
}
}<?xml version="1.0" encoding="UTF-8"?>
<LightningComponentBundle xmlns="http://soap.sforce.com/2006/04/metadata">
<apiVersion>58.0</apiVersion>
<isExposed>true</isExposed>
<targets>
<target>lightning__RecordPage</target>
</targets>
</LightningComponentBundle>【Apex:MyRefreshViewController】
public with sharing class MyRefreshViewController {
    @AuraEnabled
    public static List<Account> getAccount(Id accountId) {
        return [ SELECT Id, Name FROM Account WHERE Id =: accountId ];
    }

    @AuraEnabled
    public static String updateAccount(Id accountId, String newAccountName) {
        Account acc = new Account(Id = accountId, Name = newAccountName);
        try {
            update acc;
            return '0';
        }
        catch (Exception e) {
            return 'Update failed: ' + e.getMessage();
        }
    }
}
おわりに
いかがでしたでしょうか。
これまでもページの一部を更新する方法はありましたが、「RefreshView API」の機能を使えるようになったことで、実装が容易になったのではないでしょうか。
ご参考にしていただければ幸いです。
今回は以上です。最後までご覧いただき、ありがとうございました!